


How to Tie a Tie
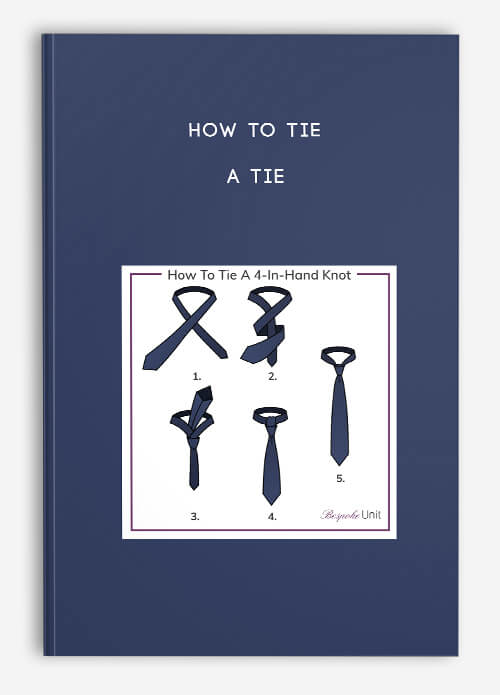
Description This article will show you how to tie a tie in 18 different ways. Want to send a power signal? What about trust in business relationships? Or random availability? One subconscious signal can give it. Tie knot. Why? This is a subliminal message that speaks to our attention to detail. You do not trust me? Look at almost every president. Complete Windsor Knot. Look for less formal business attire. Four in hand or half a Windsor knot. Each style sends a different message and goes well with a different shirt collar and neck. There are tie knots for tall guys, short guys, big guys, and skinny guys. Yet most men use one tie knot their entire life. I show you 18 ways to knot a tie so you can tie all the best tie knots – starting with the fastest and easiest tie knot, simple or oriental knot. Learn to tie a tie step by step: Simple Knot (East Knot) Knotting Instructions Learn to Tie a Tie: The Simple Oriental Knot: Drape the tie around the collar with the seam inward and the thick end on the left, two or three inches lower than the desired end position. Pass the thick end horizontally through the front of the narrow end, and then pass it back horizontally over the narrow end. Run the thick end again across the front of the knot from left to right. Now again pass the thick end behind the knot horizontally from right to left. Run the thick end again across the front of the knot from left to right. Slip your finger under this third horizontal loop. Bring the tip of the thick end under the loop around your collar and feed it behind the knot, down the front of the knot and through this third horizontal loop. Pull the thick end through the horizontal loop and press firmly. Adjust the tie by holding the knot in one hand and gently pulling on the narrow end with the other. Click here to watch YouTube video – The Easiest Knot to Tie Now you know how to tie a tie in the easiest way … are you ready for the challenge? Click on any of these 17 nodes to see if it’s right for you and get step-by-step instructions. Four In Hand Knot Half Windsor Knot Complete Windsor Knot Nicky Knot Bow Tie Knot Kelvin knot Pratt Knot Andreevsky Knot Balthus Knot Hanover Knot Plattsburgh Knot Granchester knot Victoria knot Cafe Uzel Eldridge knot Trinity Knot Christensen knot 1. Four In Hand Knot
Learn how to tie a four-hand knot: Tie your tie around your collar. The thick end is on the left, 3-4 inches below the thin end. Cross the thick end in front of the thin end. Wrap the thick end around behind the thin end and cross horizontally from right to left. Bring the thick end horizontally across the front of the knot from right to left. Slide your finger under this horizontal strip. Turn the tip of the thick end up and inward, tucking it under the loop around your neck. Feed the thick end down through the loop you held with your open finger. Pull the thick end all the way through the loop and tighten the knot tightly. Tighten the knot by gently holding it in one hand and pulling on the thin end with the other. The four-in-hand knot is one of the most popular tie knots for beginners learning how to tie a tie. It is not only easy to learn, but also one of the most ancient – it is said that British horsemen invented it to tie scarves while holding the reins of four horses in the other hand. This knot requires less tie length, making it a great choice for tall men trying to tie a regular tie. The slimmer shape is ideal for narrow open collars and button-down shirts. 2. Half Windsor Knot Learn how to tie half a Windsor knot: Wrap the tie around the collar so that the wide end on the right hangs down to the hip, and the thin end on the left, at about chest level. Cross the wide end in front of the thin end from right to left, making an X shape below the chin. Fasten the wide end of the tie horizontally around and behind the thin end. Take the wide end from the top and through the X hole and pull it tight. Take the wide end with your right hand and wrap it from the front around the thin end, from right to left. Keeping the triangle intact with your left hand, bring the wide end to your chest and from the loop pass it over the X. Using your left index finger, open the triangle that has now formed above the cross and extend the wide end all the way. To adjust the length, pull the knot up towards the collar while pulling the thin end of the tie downward. You may need to adjust the horizontal hinge to make sure it is flat and level. Along with the four-in-hand knot, the Half Windsor is best suited for guys just starting to learn how to tie a tie. This knot is the perfect choice for medium-wide to thick ties. It is the most versatile and popular tie knot. Since half Windsor requires less tie length than a larger Windsor knot, it is also a great choice for large and tall men trying to wear a regular tie. 3. Complete Windsor Knot
Learn how to tie a Full Windsor Knot or a Double Windsor Knot: Slip the tie over the collar so the wide end on the right hangs 4-6 inches below the waist. Cross the wide end horizontally in front of the thin end, making an X shape just below the chin. Roll the wide end up and under the loop around the neck, pointing up at the X. Use one finger to hold the X in place. Pull the wide end all the way down. Bring the wide end behind the knot and slide it horizontally from right to left. Flip the wide tip up and pull it diagonally across the front of the knot. Slip the wide end over the top of the loop around your collar and pull it down. It should appear to the left of the thin end. Bring the wide end horizontally across the front of the knot, from left to right. This forms a horizontal stripe. Slip your finger into it and hold it in place. Bring the wide end under the loop again, around the collar with the tip pointing up. Turn the wide end down and run the tip through the horizontal loop that you saved with your finger in step 8. Pull the wide end all the way down and smooth out any creases or slack in the knot. When I am asked how to tie a tie, the full Windsor knot is always mentioned. Also known as Double Windsor, the Full Windsor has a large, triangular symmetrical shape and is ideal for wide collars as well as men with a large neck. Additional tie length is required for the Windsor knot due to the two wraps. Tall men with large necks will need a tie ranging from 61 to 64 inches. 4. Nicky’s knot Learn how to tie Nicky’s knot: Wrap the tie around the collar with the seam outward and the thick end on the left, about two inches lower than you want the finished position to be. Cross the thick end under the thin end, making an X shape under the chin. Flip the thick end up in front of the loop around your collar, then tuck it down through the loop, exiting to the left of the thin end. Bring the tip of the thick end horizontally across the front of the knot. Slide your finger under the horizontal strip you just created on the front of the knot. Bring the tip of the thick end up and under the loop around your collar. Thread the tip of the thick end down through the horizontal loop you created in step 4. Pull the thick end all the way through the horizontal loop and press firmly. Adjust the knot as needed by holding it with one hand and pulling on the narrow end of the tie with the other. 5. Bow Tie Knot Learn How to Tie a Bow Tie Knot: Start with a bow tie draped around your neck with the seams facing down and the right side longer than the left. Place the right end over the left, making an X shape just below the chin. Hook the longer end over the X to create a simple knot, similar to the first knot when tying your laces. Pull tight and leave the long end on your shoulder. With your index finger on the widest part of the curve of the shorter end, bend it to create a bow shape. Place the folded tip across the collar with the shorter end as close to the neck as possible. While holding the bow created above with the index and thumb of your left hand, bring the longer end straight down over the shorter end in the middle of the bow. Using your right hand, bend the longer end back towards your chest, pinch the fold, and double the tip to make a wing. Tuck the folded tip of the longer end over the folded tip of the shorter end and through the small loop you formed when you first passed it over the knot. With the wings in place, pull the loops behind them to tighten the vertical front knot. Hold the front of the knot down with one finger and wiggle the wings until they are symmetrical. Make final adjustments. Make sure your bow tie is flat and horizontal on your collarbone. Its end! Now you know how to tie a tie and how to tie a bow tie. 6. Kelvin knot
Learn how to tie a Kelvin knot: Wrap the tie around the collar with the seam facing outward and the thick end on the left, dropping two to three inches below your desired end position. Cross the thick end under the thin end from left to right, creating an X shape under the chin. Run the thick end back across the front of the knot from right to left. Continue to wrap it around the thin end and pass it back from left to right behind the knot. Then again slide the thick end horizontally across the front of the knot from right to left. Slip your finger under the horizontal strip that this creates. Tuck the thick end up under the loop around your collar. Draw the tip of the thick end down through the horizontal loop you created in step 4 (but not the smaller loop you created in step 3). Pull the thick end all the way through the horizontal loop, pressing the knot down firmly into place. Tighten the tie by grasping the knot with one hand and gently pulling on the narrow end with the other. 7. Node “Pratt” Learn how to tie a Pratt knot: Drape the tie around the collar with the seam outward and the thick end hanging down to the left, 1-2 inches below the desired trim. Cross the thick end under the thin end, forming an X shape under the chin. Pass the thick end through the loop. Pull the thick end all the way down and flip the tip over so it points to the left. Bring the thick end horizontally across the front of the knot (from right to left). Stick your finger behind the horizontal strip you just created. Slide the thick end up through the loop at the bottom. Point the tip of the thick end down – right over the narrow end. Pull the thick end down through the horizontal tape. Press it firmly into place. Adjust the tie by grasping the knot with one hand and gently pulling on the narrow end with the other. 8. Andreevsky Knot Learn to tie the St. Andrew’s Knot: Drape the neck tie around the collar with the seam outward and the thick end on the left, two to three inches below your desired finishing position. Cross the thick end horizontally under the thin end, making an X shape under the chin. Bring the thick end horizontally across the front of the thin end. Continue wrapping the thick end around the thin end, going horizontally behind the back of the thin end from left to right. Flip the thick end straight up and over the front of the knot, then tuck it back behind the knot. Pull the thick end out and to the left of the thick end. Run the thick end along the front of the knot from left to right. This forms a horizontal stripe. Slide your finger over it. Finally, bring the thick end over the knot and tighten it through the horizontal loop you made in step 7. Pull the thick end all the way and tighten the knot by grasping it with one hand and gently pulling on the thick end with the other. 9. Balthus knot Learn how to tie the Balthus knot: Place a long tie around your neck, seam up, and the thick end to the left. The thick end should hang down at least to mid-thigh and the thin end to mid-chest. Cross the thin end over the thick one. Bring the thick end in at the front, fold it over the thin end, and cross behind it. Bring the thick end back from the front and loop over the thin end, this time on the left side of the forming knot. Fold the thick end down and across, ending behind and to the right of the thin end. Flip the thick end up and loop over the center of the knot. Now drop the thick end behind the knot, crossing it from right to left. Bring the thick end horizontally across the front of the knot, crossing from left to right. Bring the thick end behind the knot and up. Leave some freedom in the horizontal passage that you just made. Slide the thick end through this horizontal passage. Adjust by gently pulling down on the thin end while pressing the knot in place with your other hand. Ideally, the tie under the knot should be fairly wide, but still fall down to the waistline. The Balthus Knot is highly recommended for any fashion event – make sure you wear it to these gourmet dining, theater and art events. 10. Hanover Knot
Learn how to tie the Hanoverian knot: Drape the tie around the open-seam collar with the thick end on the left, dropping 4-5 inches below your desired finishing position. Cross the thick end under the narrow end from left to right, creating an X. Run the thick end along the front of the narrow end from right to left. Hold the forming knot with one hand. Slip the thick end through the loop around the collar. Lower the thick end as far as it will go and pull it through. – but don’t push it through the horizontal bar you created in step 4. Turn the thick end from right to left, crossing behind the knot. Flip the thick end up, going diagonally in front of the center. Pull the thick end down through the loop and let it come out from behind the knot – hanging to your right. Bring the thick end horizontally from right to left. This creates a second horizontal stripe. Slide your finger under this tape. Then lift the thick end up, passing once more from under the loop around your collar. Bring the thick end down through the horizontal tape and press everything firmly in place. 11. Plattsburgh Knot Learn to tie the Plattsburgh knot: Drape the tie around the open-seam collar with the thick end on the left, 4-5 inches below your desired finishing position. Cross the thick end of the tie under the narrow end to form an X. Hold on to that X and flip the tip of the thick end up the front of the loop around your collar. Slip the thick end through the loop and return it to the left side. Point the thick end up. Bring the thick end back in front of the loop – still remaining to the left of the narrow end. Slide the thick end down through the loop on your right. Bring the thick end horizontally across the front of the knot from right to left. Slide your finger under the horizontal strip you just created. Slip the thick end through the loop around your collar at the back. Feed the thick end down through the horizontal tape and press firmly. Tighten the knot by holding it with one hand and pulling on the narrow end with the other. Adjust the edges so they look symmetrical. 12. Granchester knot Learn to tie a Granchester knot: Drape the tie around the collar with the seam outward and the thick end on the left, 4-5 inches below your desired finishing position. Cross the thick end under the thin end to form an X. Wrap the thick end across the front of the thin end, going horizontally from right to left. Then wrap the thick end from left to right over the thin end. Now wrap the thick end across the front from right to left. Use your finger to hold the horizontal strip you just made in place. Slip the thick end of the tie under the loop around the collar. Flip the thick end down and let it hang in front of the knot. Continue using your finger to hold the tape in place. Wrap the thick end behind the knot from right to left. Wrap the thick end around the front of the knot from left to right and insert your finger under the horizontal strip you created. Pass the thick end through the loop around the bottom of your collar. Feed the thick end down through the horizontal tape, press it firmly and pull the corners of the knot into an even shape. 13. Victoria Knot Learn how to tie the Victoria knot:
Drape the neck tie around the collar with the seam inward and the thick end on the left, approximately 2-3 inches below the desired end position. Cross the thick end of the tie horizontally in front of the narrow end and then behind it. Run the thick end over the front again from left to right. Draw the thick end behind the knot from right to left. Run the thick end over the front a third time and slide your finger under the new horizontal strip you just created. Insert the thick end through the loop around the collar that extends from underneath. Feed the thick end down through the horizontal tape. Pull the thick end tightly into place. Adjust by grasping the knot with one hand and gently pulling on the narrow end with the other hand. 14. Cafe Knot Learn how to tie the cafe knot: Wrap the tie around the collar with the seam inward and the thick end on the right, about half an inch lower than you want the finished tie to hang. Cross the thin end over the thick end to form an X. Then slide the thin end up through the loop you just formed behind the X. Flip the thin end over the knot. Bring the thin end behind the knot from left to right. Then slide the thin end across the front from right to left. Now bring the thin end behind the knot and up through the loop around the neck. This will leave a horizontal strip across the front of the knot. Slide the thin end over the front of the knot so that it hangs down. Bring the thin end slightly to the left of the thick end, then fold it around the knot, going from left to right. Bring the thin end up in front of the knot, pointing the tip up and towards the left shoulder. Slip the thin end through the loop around your collar, behind the rest of the knot, and exiting on the left side of the thick end. Pull the thin end down firmly and take time to position the center of the knot. You want the diagonal legs to rise at the same angle, meeting right under your chin. Flip the thick one forward and up. You can throw it over your shoulder. Turn the thin end with the tip up and pass it through a single horizontal loop through the back of the knot. Pull the thin end all the way through the loop and pull it tight. Flip both ends of the tie down. Tighten the knot carefully, holding it in one hand and pulling on the thick end with the other. The cafe knot is a complex knot. Don’t try this until you are very familiar with the basics of how to tie a tie. 15. Eldridge knot Learn how to tie the Eldridge knot: Wrap the tie around the collar, with the thick end on the right, exactly where you want it to hang when the knot is complete. Pinch the wide end of the tie to create a dimple, and cross the thin end in front of the thick end as horizontal as possible. Wrap the thin end around a cruciform, crossing horizontally from right to left. Slip the thin end through the loop around the collar. Place the thin end horizontally across the thick end. Tuck the tip of the thin end into a loop around the collar and flip it over the top of the knot, crossing diagonally downward from left to right. Pull it down tightly to form a diagonal strip along the right side of the knot. Bring the thin end past the back of the knot and up through the diagonal tape. Feed across and pull tight to create a diagonal strip on each side. Guide the thin end of the tie straight up, then tuck it under the loop around the collar, exiting to the right of the knot. Twist the thin end of the tie up and around the circle around your collar. Leave some slack in this step. Tuck the tip of the thin end down and to the left, under the loop around the neck, and up through the loop you just created. Flip the thin end over the top of the loop around your collar. Tuck the rest of the thin end out of sight, either behind the thick end or sliding horizontally under the loop around the neck. Tighten if necessary by pulling on the thick end and adjust each diagonal strap to approximately the same width. This is a very tricky tie knot that says you really know how to tie a tie … and you’re not afraid to show it off.
16. Trinity Knot Learn how to tie the Trinity knot: Slip the tie over the collar with the seam facing inward and the thick end hanging down on the right where you want the finished tie length to be. Cross the narrow end diagonally in front of the thick end by making a cross and tuck it under the loop around your neck. Bring the narrow end back over the top of the loop. Slide the narrow end horizontally behind the thick end. Slip the narrow end over the top of the loop around your collar. Bring the tip of the narrow end down and out under the loop around the neck, on the far right side of the knot. Bring the narrow end horizontally across the front of the knot from right to left. Slip your finger under the horizontal strip that this creates. Bring the narrow end under the loop around your collar and down through the horizontal tape. Run your finger under the narrow end just above the knot. Draw the narrow end around the thick end from right to left. Feed the tip of the narrow end up the loop around your collar and through the small vertical loop you reserved in step 8. Pull the narrow end all the way through the vertical loop, still leaning diagonally up and to the right, and press it down. Pull any slack out of the knot and adjust as needed to make the three visible folds the same size and angle. Hide the narrow end either behind the thick end or under the loop around the collar. 17. Christensen knot Learn how to tie the Christensen knot: Wrap the tie around the collar with the thick end on the left. This end should hang a good four to six inches lower than your desired end length. Cross the thick end horizontally in front of the thin end from left to right. Bring the thick end over the thin end horizontally from right to left. Flip the thick end up in front of the loop around your collar. Tuck the thick end down over the loop around your collar, exiting the right side of the thin end. Slide the thick end in front of the previous horizontal stripe and the diagonal created in step 5. Slip your finger under this new horizontal intersection. Bring the thick end over the knot from left to right. Place the thick end across the front, right on top of the horizontal fold you made in step 6. (Your finger should still keep the fold open.) Hold both horizontal stripes slightly off the collar with your finger. Bring the thick end under the loop around your collar. Slide the thick end down over both horizontal transitions and pull it through. Pull the knot into place while holding it with one hand. Now, gently pull on the thin end with your other hand. Use your finger to tease the diagonal folds until the X-shaped knot is very clear.


tristian –
This is Digital Download service, the course is available at Coursecui.com and Email download delivery.